Well I finally got round to purchasing an Arduino Uno Open Source Prototyping Platform and first impressions are !WOW. I am genuinely impressed with the overall package, its flexibility and quality of the hardware and software. First off, getting up and running on your favourite OS is a breeze, with detailed step by step instructions available on the Arduino site.

Aside from the basic Uno itself:

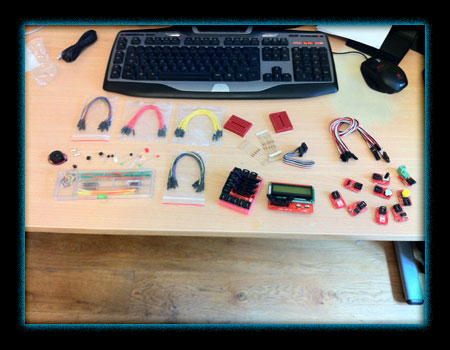
I invested in a few extras from a UK outfit called Cool Components that sell the Arduino and plenty of shields and extras. To give me enough to start with, I picked up:
- 140-Piece Wire Kit
- Electronic Brick Kit
- Generic Starter Kit
- Jumper Wires – Female to Female
- Jumper Wires – Male to Female

Although in hindsight, I should have bought a few more male to male jumper cables as these seem to be the primary cable type!
Getting up and running was a breeze, remembering my basic electronics from my childhood stood me in good stead to build a small circuit, and google/youtube filled in the blanks easily!
So what did I build?

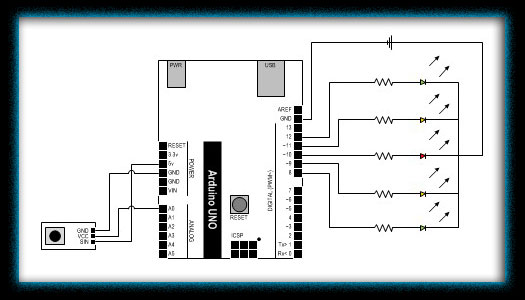
Essentially its 5 LEDs running in a sequence, with the timing controlled by an analogue rotary switch or potentiometer, as I learned it was called. It actually took longer to figure out it wasn’t called a “rotary encoder” which is apparently something very different and digital, than it did to code the entire program and build the circuit!
The circuit is simple:

…and so is the program:
/*
    Jabawoki Light tracer V1.0
    22/07/2011
 */
  int potpin = 0;
  int val;

void setup() {
  pinMode(12, OUTPUT);
  pinMode(11, OUTPUT);
  pinMode(10, OUTPUT);
  pinMode(9, OUTPUT);
  pinMode(8, OUTPUT);
}

void loop() {
  // Read the Analog Pot
  val = analogRead(potpin);

    // Switch the LEDs on
      digitalWrite(12, HIGH);
      digitalWrite(8, HIGH);
      delay(val);
      digitalWrite(11, HIGH);
      digitalWrite(9, HIGH);
      delay(val);
      digitalWrite(10, HIGH);
      delay(val);

    // Switch LEDs off
      digitalWrite(12, LOW);
      digitalWrite(8, LOW);
      delay(val);
      digitalWrite(11, LOW);
      digitalWrite(9, LOW);
      delay(val);
      digitalWrite(10, LOW);
      delay(val);
}
What more could you ask for in a prototyping platform?
You can download the code and schematics for this project from the downloads section
Watch this space, I have 5 key projects I am planning once I get my head properly around this, some of which will blow your mind.
Here is some video of the project working in all its glory!
[youtube]http://www.youtube.com/watch?v=K9rIHjsyiUs[/youtube]


