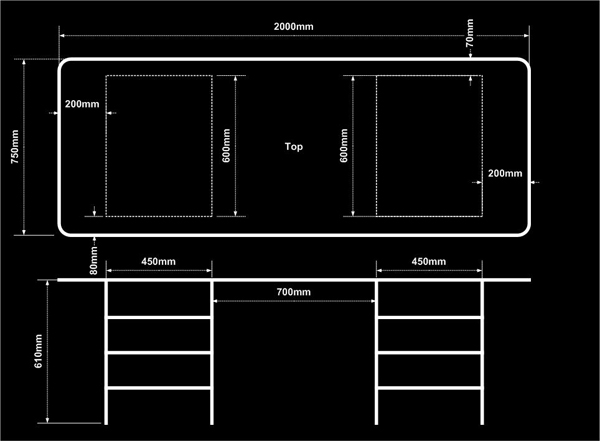
Welcome

Welcome to my digital home! There are lots of articles you might find helpful buried in this site on topics such as modifying an Alfa Romeo 159, rebuilding a Lotus 7 (Robin Hood 2B), not to mention a ton of stuff on technology in general. It’s all here somewhere, so use the search function or navigate using the menu structure. if you want to talk, reach out via the contact function, I usually do answer!

Random Post Selection
InfoSecOpen post to see coverage: Computer Fraud and Security – February 2009 – Ethics & HackingRelated Images: [...]
GeneralNative Instuments – Traktor Scratch This is the final choice and the result of much deliberation and research. It would seem that for the most part its a two horse race, Serato vs Traktor. I’ll give you the highlights to make it simple. Serato is very very stable, easy to use and generally a rock solid solution to mixing MP3’s. Traktor has less reputation for stability but so many more features and possabilities when it comes to taking your music to the next level. This is best domonstrated bythe release of traktor 3.2 and its ability to mix 4 sources in the same interface! this means you could have 2 x decks + two other input sources all up at once mixing through a 4 channel mixer, when used with the Audio 8 interface. It was this feature that won it for me. With this I can utilise Ableton Live like it was another deck, and have a 4th source as something like a standalone sequencer, drum machine or other random piece of electronic excellence. Now all I have to do is save my pennies and actually buy one! 🙂 Related Images: [...]
LiveMixesOldschool Hard House from the archives   https://jabawoki.com/wp-content/mp3/Jabawok_17122000_Stompin_Pumpin_Hard_House.mp3 Podcast: Play in new window | Download Related Images: [...]
InfoSecOpen post to see coverage: Insurance Times – March 2009 – Data Loss Issues Related Images: [...]
GeneralBeing a technologist and a DJ, I often find myself torn between the need for blinking LED’s and a product that adds value. Take for instance my need to utilise MP3’s rather than Vinyl. Its a simple requirement in so much as i just want to: a) mitigate many, many boxes of 12″ vinyl b) get easier access to the latest music c) play tracks of my own creation without having to have them cut to 12″, and finally d) retain the look and feel of my 1210’s with all their analogue loveliness! These requirements put me in the digital DJ space, with the key players being Traktor and Serato. As you will have seen in previous posts, I had 100% decided to go with Traktor, simply because it had the ability to run 4 live sources through it, that as well as the fact that the Audio 8 interface is pretty solid, and very versatile. The thing is, an Audio 8 interface is great if your moving from gig to gig, but these days, I work for a living, so the chances of me playing out are slim, so why spend £500 on TraktorScratch V3 when I can get one of these instead 🙂 The Korg Zero4 is simply amazing. It has a multitude of effects, versatility and that all important ability to plug straight into the PC and run Traktor. Now, I already have a Pioneer DJM600, which is an impressive mixer and still considered one of the best on the market today, but, this mixer just exudes quality and functionality. For starters its a Korg product, so your in the realms of world class engineering, but then its got so many features it is unreal. Take a look at this, this is the per channel effect section of the mixer: Then, to complement that you have the same set of effects on the master channel! so theoretically you could apply LFO LPF to Channel A, LFO HPF to Channel B and a Phaser to the master out, all during the same mix. That would sound pretty impressive. Here are the main channel effects: Now, I really want to find out exactly what the effect “Decimator” sounds like! To top all that off, you get a fully featured BPM locked Sampler: So all in all, you get an awful lot of toys for your money. Incidentally, the Korg is retailing at £750, only £250 more than the TraktorScratch V3 Package. You will of course need to get a set of control records at £15 each, and a copy of Traktor V3.2, but despite that, I think its an investment worth taking. So much so, that it is one I am seriously contemplating. The only downside of course, if I ever end up in a situation where someone says, hey, come play a set fro us, its gonna be difficult to turn up with a whole mixer rather than a simple box to interface! Related Images: [...]
InfoSecCourtesy of the Institute for Information Security Professionals As I mentioned in the opening CEO article, the inaugural Top Gun event in Manchester was a great success on many fronts.  We had 20 participants, organised into the Red and Blue teams, plus 5 members of the Control Team, and the day just seemed to fly past, so intense was the concentration, interaction, ingenuity and fun. We cannot give too much away as to the content of the case study or the processes we followed on the day, for fear that we might spoil some of the element of surprise for participants in future events.  Suffice to say that those who were there threw themselves into the exercise and, accordingly got the most out of it, as well as proposing a few additional suggestions for developing and improving it for future players. Let us however, convey the particular views of a member of one of the teams, and let them tell you what they thought of the event. “TopGun, The Blue View. (Jay Abbott, PwC) I have to admit, I was genuinely sceptical about the TopGun event as the idea of playing the Security equivalent of Battleships during one of my busiest times of the year was not one that featured far up the “to do” list, that said, I am genuinely pleased that I made the time to attend. We arrived with very little information about what was planned, and were immediately split into two teams, Red and Blue, The Red were of course the attackers, and Blue were the defenders and the teams split had been pre-planned by the organisers to ensure that a good cross section of skills rested in each team to keep things fair. The remit was simple, we each were given suitable pieces of a puzzle, i.e. some deliberately sketchy information related to the organisation, typical of that you would find on your first day of work or your first information gathering exercise. From there it was a case of building a better picture of what you have and figuring out the best way forward (sound familiar?). At this point, the teams were physically split and departed into adjacent “war rooms” to prepare their respective strategies. We each could communicate with our “control” staff, who acted as the coordination of the event and holders of information. The co-ordination role was pivotal in the success of the event as they were able to coordinate the virtual attack and defence strategies in real-time to keep the feeling of real-life and to ensure that the game was fair. From a blue perspective it was business as usual, we had a budget and an environment to protect, we had to evaluate the skills in our team, establish specialism’s that could work in key streams, and run the entire thing like a project. All in all it was a very worthwhile day that created a great deal of discussion and provoked much debate. What I personally took from the day was something that I see all too often, but is perhaps not as obvious to all, to quote Paul Dorey on the day it is summed up in the phrase “Security is Asymmetric”. Put simply this is the fact that someone attacking an organisation need only find one hole or vulnerability in order to succeed, while those protecting the organisation must try to plug every hole and mitigate every vulnerability to be secure.” Event wrap-up discussion and lessons learnt – great work everyone! The participants captured their comments on an evaluation form and we are reviewing and acting on those comments.  They also scored the event out of a scale of 1 to 5, and rated the event at 4.3 overall, but with specific scores of 4.5 for facilitation and presentation, and 4.6 for opportunity to discuss and exchange ideas.  A great success by any measure. Thanks to all involved, and to PwC, our hosts for the day. Courtesy of the Institute for Information Security Professionals Related Images: [...]
RH2B Build DiaryI was hoping when I rebuilt the suspension that the brakes were ok. Well they looked ok, and the car seemed to brake fine so I didn’t think I needed to do anything to them until the winter. Well, turns out that they were a little less than perfect and caused an MOT fail! According to the Brake test, there was a 46% difference between NSF and OSF, whcih was a bit of an issue! I am a little unsurprised though as during the suspension rebuild, suspending a caliper on cable ties and occasionally knocking it off was more than likely to have upset a 15 year old braided hose! The fix was simple, rebuild both callipers with new seals and pistons, put new brake lines on, and flush the whole system. Calliper Rebuild Kit First up was a “Bigg Red” Calliper rebuild kit, cheaper than expected, coming in at £27 delivered! This gave me a new set of seals and a new piston for each calliper. The pistons that came out were pitted so a rebuild kit that included pistons was key. While the callipers were apart is was an ideal time to spray them with my favourite Auto-K Calliper paint, so I set about doing that. While the wife was out one day, I took advantage of the oven and decided to cure the paint to 200c (needed for the paint to harden) off the car and before I rebuilt everything. My version of a happy meal Before paint, I put the pad carrier in a vice and filed smooth all the pad glide surfaces to remove many years of corrosion and paint. After I painted them again, I removed the overspray with a file on this area and before putting the pads in coated the entire slide area in copper grease. Filed pad glides The new braided lines were supplied by GBS through Kit Spares, and again, were great value for money. A full set (4 lines) was around £60 delivered, which considering they were branded Goodridge and very high quality, is excellent Value for Money. I have only installed the front lines for now as the rear callipers were fine, but i’ll do the rear end in the winter! Braided lines The brake fluid was old and had lots of corrosion in it. When I flushed the system through the furthest calliper tons of black floaty bits came out. I am pretty sure this fluid had been in the car for several years! It took about 1.5l of fluid to fully flush & bleed the system, but boy was it worth it. The final product went back together very easily and an MOT retest showed perfect front brake bias so I cant argue with that! Another job I wasn’t expecting ticked off! Related Images: [...]
3D / Alfa 159So, many of you who read my previous post on the TEVO Black Widow 3D printer might have thought, oh hes bought another toy. Well, while that is mostly true I had an actual reason for getting one. — Download the free model and print your own —   I have long been a modifier of my toys, and the Alfa 159 I drive takes the brunt of my desire to modify and improve. To that end there is often a gap between my imagination and my ability to manufacture, that has long eluded me. Until 3D printing became a thing. So here’s the issue. The Alfa 159 halogen headlights suck. Even with the brightest bulbs available in they still suck, So the best option is/was to fit aftermarket HID’s. Until this year that was all well and good and the car would pass its annual MOT with aftermarket HID’s fitted, however this year it looks like the rules are changing and if it has after-market HID’s fitted it will fail 🙁 So, the options were, fit Halogens back in or go with the latest style high power LED bulbs. The main issue with the latest LED Bulbs is they get super-hot and need a big cooling assembly on them which make them too long for the headlight. So to use them you have to leave the dust caps off the back of the  headlight which is less than ideal as it allows the moisture and dirt to get in and cloud up the lights. I have been trialing a few different LED’s and all of them are far too long. If you look at the image below you can see just how far this particular LED protrudes, and this is one of the shorter ones! This LED can be purchased from ebay for £19.99 and I have been using them in my main bean for a while now. I am quite happy with them as main beam lights but only trialing them on driving lights at the minute. They do require a small amount of the plastic surround shaving off to fit in the driving light position though. just 1mm from each side as they are a bit fat, but its a 2 second job with a knife and doesn’t harm them. Once they are installed though, as you can see there is no way the stock dust cover goes back on! So the solution is simple. I need a deeper dust cover that can accommodate a longer bulb. Problem is, they don’t exist, and to have one made would be prohibitively expensive. Until you add a mad Englishman who subscribes to the old ways of “man in shed will make stuff” but likes to embrace modern manufacturing techniques, on a budget. The result, well that would be “my first thing” available for any 159’er who wants one to download and print for free (yes they fit a Brera and a Spider too) 🙂 You’re welcome. All in all this took me a weekend to do, and includes the time it took me to source a decent CAD tool, learn it and figure out how to transpose the original shapes into CAD. It took 19 drafts, 4 prototype prints and at least 5 complete “start again from scratch” moments!! All in all I’m pretty happy with it, and the main thing is it actually works. I will reprint these at some stage in ABS plastic as my printer is only setup for PLA at the minute which by its nature is biodegradable and will not last too long in the engine bay. I may yet refine the shape as I go to take off some of the sharper edges but it’s a perfectly functional solution to a problem that was going to remain otherwise unsolved. I have many plans for future parts that I will be designing so this is just the start 🙂 Related Images: [...]
GeneralWell, after the change of room size the RP6G2’s lack of low frequencies eventually pushed me to go the extra mile and get the KRK10s. Initial feedback on it? Its got so much bass! I know that’s the whole point of it, but wow, I like bass and even I struggle with this sometimes. So much so that I actually bought the Boss FS-5L latched foot switch so that I could bypass the sub from time to time and allow the full range of frequencies back to the RP6G2’s!!!! So….. what does all this mean? Well, first off the KRK10s is one hell of a good sub, well built, sounds great and can really pump out some power, so much so, it rattles all of the radiators in every room of the house when its wound up! that said, it more than matches the RP6G2’s and compliments them well. The unit itself acts as the hub of your system, so you route your main outs to the unit from your source, then plug each of the other 2 speakers into the sub. My preference for this was to use TRS Balanced Jacks from my mixer to the Sub, then XLRs from the Sub to each speaker. A good, cheap cable provider I use regularly is: Vision Sounds on eBay, they are quick to process, cheap to buy and decent quality, so that works for me! The KRK10s comes with a built in Crossover, with a knob on the back to set the Crossover frequency. I have played with this for a while now, and for me, I find that the best option is to keep some of the bass going to the RP6G2’s and let the sub handle the low stuff. To that end, I tend to have my crossover point at around 50Hz, which lets the RP6G2’s handle the punch in a beat while the KRK10’s handles the roll. I find this approach keeps the imaging better in my opinion. The built in amp comes with the same +-6db of gain through a control knob on the rear. Mine is set to -4db and that still, on some tracks and sources, overpowers the RP6G2’s at 0db gain! For this reason, I find that it is very useful to have an EQ of sorts in the mix so you can compensate for different sources. I make use of an Alesis MultiMix8:Firewire to bring each of my audio sources together, which gives me a low/med/high EQ on each channel (except the Firewire output, but that’ a whole different article!). The final, but very useful feature that comes with this unit is a bypass ability. You can plug in any latch-able foot pedal, but the Rokit site recommends the Boss FS-5L. I have the FS-5L and agree with them, its well built, but not so hard a switch that you can’t use it by hand if you want it on your desk. The reason for the bypass is actually quite a good one. Sometimes, you need to remove the bass effect of the sub and revert back to just the bass of the RP6G2’s. To do this without a bypass and making use of an EQ, you would taint the bass feed to the RP6G2’s and actually not give an accurate image, however, the bypass, when engaged, simply kills the Sub, bypasses the EQ and outputs a full range signal to the RP6G2’s leaving you with a nifty way of getting an accurate frequency reproduction for those absolute moments of audio clarity! If your seriously thinking of adding a KRK10s to your setup, here are some tit bits of advice for you: Buy the Boss FS-5L Latched Foot switch at the same time to give you the ability to bypass the sub easily when needed If possible put at least a basic 3 band EQ between your source and the entire setup, as the ability to gently retard the bass is very handy Make sure you have no neighbours attached, above, below or to the side of you, or you will quickly make some new enemies! All in all, I am genuinely blown away with my overall investment into the Rokit camp, and will happily pick up an ERGO when funds can justify the £500 price-tag! KRK10s Specs: 225 Watt (peak) Powered Sub woofer for Studio Use SPL: 110dB Music and 113dB Peak 10” High-Excursion Glass Aramid Composite Woofer Frequency Response: 34Hz – 50Hz to 130Hz Variable (+/- 1.5 db) Variable and Sweepable Low Pass Filter 80Hz High Pass Filter Radically Curved Front Baffle Design for Amazing Performance Front-firing port provides low frequency extension without boundary coupling Bypass Control using Standard Foot switch Related Images: [...]
InfoSecOpen post to see coverage: Sheffield Star Business Monthly – July 2009 – Hacking Related Images: [...]

Related Images:

Related Images: