

Welcome to my digital home! There are lots of articles you might find helpful buried in this site on topics such as modifying an Alfa Romeo 159, rebuilding a Lotus 7 (Robin Hood 2B), not to mention a ton of stuff on technology in general. It’s all here somewhere, so use the search function or navigate using the menu structure. if you want to talk, reach out via the contact function, I usually do answer!
Random Post Selection

InfoSecI read an interesting article the other day about the fact that Cray have toppled IBM of the top spot in the super computer race with a staggering 1.64 Petaflops of processing grunt from its XT Jaguar supercomputer. Of course, I expect this will be short lived given the Roadrunner has a theoretical 1.7 Petaflop capacity.
So what I hear you cry!
Well think of this, Cloud computing is here to stay and can yield some massive processing potential, but its still quite young and clouds tend to be privately owned and sold to the highest bidder. But what if we could all club together and build a cloud so big, so powerful it blew the Crays and IBMs of this world out of the water?
Again, I hear the crys of yeah right!
Well, ask yourself this, do I own a PS3? if the answer is yes, welcome to the “PSCloud”
The concept is simple, in a PS3 there is an IBM Cell Processor with 8 CPU cores, a very powerful CPU indeed! and guess what, IBM’s Roadrunner uses them too, yes, the Roadrunner has just short of 13,000 Cell Processors in it, of course it has quite a few AMD’s as well (6.4K), but the cells are the bulk of it.
So lets look at the facts, the same basic architecture used for the supercomputer market is in our homes, and cloud computing is here to stay, well I’m no rocket scientist but I reckon if we put these two concepts together, Roadrunner and Jaguar have a problem on their hands.
As of November 2008, over 16 million PS3’s have been sold around the world, of which we can assume by the design and nature of the unit, that nearly all of them are connected to the internet, so if we were able to join them into a single cloud, what sort of processing power could we achieve?
I ask you this….. If 13,000 Cells and 6K AMD’s get you 1.6 Petaflops, what would 16million Cells get you?
All we need to make this happen is a software/firmware update to turn the PS3 into a cloud member and a peer based command and control mechanism, any programmers out there?Related Images: [...]
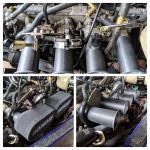
RH2B Build DiaryThe first job on the agenda for the Hoody was to fix some rather terrible intake trumpets! The independent Throttle Bodies that were installed onto the engine are, well, how do I say this….. a bit shit. While there is a long term plan around changing these I needed a better short term solution to a specific problem. The trumpets kept falling off!
Reading the original build diary there is a sentence that reads “Modified Maplin Speaker trumpets as air intakes”. That should be enough to make you shudder, it did me! So first things first was to fire up Fusion 360 and get to work with the vernier calipers!
After several iterations I found a design that worked. It has sufficient grip inside the intake to hold itself steady and a small ridge around the outside to stabilize itself. There was of course no where to bolt or secure an intake trumpet to as these ITB’s were once a dellorto carburetor and twice as long. (The builder literally cut them in half!) I had to design two types of intake as one of the 4 had to accommodate an air temperature sensor, but it was a simple enough modification once I had a good base design.
4 3d printed trumpets ready for installation.
Several printed iterations, as well as some R&D into the right type of material to print the final versions in was necessary. In the end I opted for an engineering Grade Carbon Fiber infused Nylon composite from Novamid. This material boasted a very high heat deflection temperature, extreme strength and nearly zero shrinkage whcih was ideal for my situation. It wasn’t cheap stuff though!
All in all the project took a while due to 1) me learning new skills in Fusion, 2) learning how to print composite materials and 3) modifying my printer to cope with the composites. That said, it was thoroughly enjoyable!
Related Images: [...]
Alfa 159Before I even started this project, I spent quite a lot of time figuring out potential box sizes and planning the acoustics of the project. The overall goal was maximum SQ & Power balance with the least boot space loss possible! No mean feet to achieve.
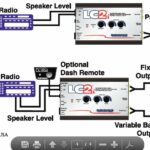
I opted to retain the stock OEM head unit rather than go for an after-market double-din one as I wanted the overall look and feel of the car to remain normal, while improving the audio characteristics and overall frequency response. In order to achieve this I made use of an Audio control LC2i active, line level converter. A unit from the USA that is very special and literally takes speaker level outputs up to 400W RMS and then runs them through a series of electronic clean-up routines to get a perfect line level out for the sub-woofer, than can also be controlled by a remote gain control, and a perfect 2 channel full range output for a mid amp (to be utilised in a further project).
This unit combined with an Infinity KAPPA Perfect 12 VQ (M3D) sub-woofer and an Alpine MRV-420 amplifier I already had was all I needed to put a little boom back into the boot!
” order_by=”sortorder” order_direction=”ASC” returns=”included” maximum_entity_count=”500″]
Related Images: [...]

LiveMixesOldschool Hard House from the archives
https://jabawoki.com/wp-content/mp3/Jabawoki_06052002_HardTrance.mp3
Podcast: Play in new window | Download
Related Images: [...]

LiveMixesA multi-part Electro Pop Mix for the masses 🙂
01. David Guetta – Memories (Bingo Players Remix)
02. Klubbheads – Kickin hard (DJ Solovey Remix)
03. Desto – Crazy (Lindberg And William Remix)
04. Snap – The Power (DJ Pomeha Remix 2010)
05. Gubellini vs Pain feat Darook Mc – Shake It Up (Javi Mula Remix)
06. Sabien And Alim – Naughty Feat Jerique (Shahin Remix)
07. Loleatta Holloway – Ride On Time 2010 (Bruno Ramos & HytraxX Mix)
08. DJ Eako & Morelly feat. Omega Brown – I Can’t Stop (Steel Mix)
09. Queen – You Don’t Fool Me (Dj Denis Rublev & Dj Natasha Baccardi Remix 2010)
10. Andrea Paci feat. Michelle Weeks – Big Mama (Elektro Mix)
11. Crookers Feat. Miike Snow – Remedy (Magik Johnson Vocal Remix)
12. Axwell – I Found You (DJ MikeY 2010 Remix)
13. Robbie Rivera feat. Fast Eddie – Let Me Sip My Drink (Chuckie Remix)
14. Topmodelz – Have U Ever Been Mellow (Rekoilz Electro Remix)
15. Niels Van Gogh And Emilio Verdez – Black Is Black (Club Mix)
16. Soul Puncherz – Speakerz Bumpin Loud (Filthy Rehab Remix)
17. Shadow Stars – Desintegration feat. Sergei Khovanksy (Mario Ochoa Remix)
https://jabawoki.com/wp-content/mp3/Jabawoki_Electro_Pop_Part_1_10082010.mp3
Podcast: Play in new window | Download
Related Images: [...]

GeneralWell, after the change of room size the RP6G2’s lack of low frequencies eventually pushed me to go the extra mile and get the KRK10s. Initial feedback on it? Its got so much bass! I know that’s the whole point of it, but wow, I like bass and even I struggle with this sometimes. So much so that I actually bought the Boss FS-5L latched foot switch so that I could bypass the sub from time to time and allow the full range of frequencies back to the RP6G2’s!!!!
So….. what does all this mean?
Well, first off the KRK10s is one hell of a good sub, well built, sounds great and can really pump out some power, so much so, it rattles all of the radiators in every room of the house when its wound up! that said, it more than matches the RP6G2’s and compliments them well. The unit itself acts as the hub of your system, so you route your main outs to the unit from your source, then plug each of the other 2 speakers into the sub. My preference for this was to use TRS Balanced Jacks from my mixer to the Sub, then XLRs from the Sub to each speaker. A good, cheap cable provider I use regularly is: Vision Sounds on eBay, they are quick to process, cheap to buy and decent quality, so that works for me!
The KRK10s comes with a built in Crossover, with a knob on the back to set the Crossover frequency. I have played with this for a while now, and for me, I find that the best option is to keep some of the bass going to the RP6G2’s and let the sub handle the low stuff. To that end, I tend to have my crossover point at around 50Hz, which lets the RP6G2’s handle the punch in a beat while the KRK10’s handles the roll. I find this approach keeps the imaging better in my opinion.
The built in amp comes with the same +-6db of gain through a control knob on the rear. Mine is set to -4db and that still, on some tracks and sources, overpowers the RP6G2’s at 0db gain! For this reason, I find that it is very useful to have an EQ of sorts in the mix so you can compensate for different sources. I make use of an Alesis MultiMix8:Firewire to bring each of my audio sources together, which gives me a low/med/high EQ on each channel (except the Firewire output, but that’ a whole different article!).
The final, but very useful feature that comes with this unit is a bypass ability. You can plug in any latch-able foot pedal, but the Rokit site recommends the Boss FS-5L. I have the FS-5L and agree with them, its well built, but not so hard a switch that you can’t use it by hand if you want it on your desk. The reason for the bypass is actually quite a good one. Sometimes, you need to remove the bass effect of the sub and revert back to just the bass of the RP6G2’s. To do this without a bypass and making use of an EQ, you would taint the bass feed to the RP6G2’s and actually not give an accurate image, however, the bypass, when engaged, simply kills the Sub, bypasses the EQ and outputs a full range signal to the RP6G2’s leaving you with a nifty way of getting an accurate frequency reproduction for those absolute moments of audio clarity!
If your seriously thinking of adding a KRK10s to your setup, here are some tit bits of advice for you:
Buy the Boss FS-5L Latched Foot switch at the same time to give you the ability to bypass the sub easily when needed
If possible put at least a basic 3 band EQ between your source and the entire setup, as the ability to gently retard the bass is very handy
Make sure you have no neighbours attached, above, below or to the side of you, or you will quickly make some new enemies!
All in all, I am genuinely blown away with my overall investment into the Rokit camp, and will happily pick up an ERGO when funds can justify the £500 price-tag!
KRK10s Specs:
225 Watt (peak) Powered Sub woofer for Studio Use
SPL: 110dB Music and 113dB Peak
10” High-Excursion Glass Aramid Composite Woofer
Frequency Response: 34Hz – 50Hz to 130Hz Variable (+/- 1.5 db)
Variable and Sweepable Low Pass Filter
80Hz High Pass Filter
Radically Curved Front Baffle Design for Amazing Performance
Front-firing port provides low frequency extension without boundary coupling
Bypass Control using Standard Foot switch
Related Images: [...]
LiveMixeshttps://jabawoki.com/wp-content/mp3/Jabs_20092001_Summer_House.mp3
Podcast: Play in new window | Download
Related Images: [...]

LiveMixesJust messing around with some choonage, only 30 minutes or so long but some interesting choons and it doesn’t sound too bad
https://jabawoki.com/wp-content/mp3/122009JabawokiMessinAround.mp3
Podcast: Play in new window | Download
Related Images: [...]
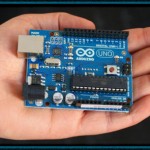
ElectronicsWell I finally got round to purchasing an Arduino Uno Open Source Prototyping Platform and first impressions are !WOW. I am genuinely impressed with the overall package, its flexibility and quality of the hardware and software. First off, getting up and running on your favourite OS is a breeze, with detailed step by step instructions available on the Arduino site.
Aside from the basic Uno itself:
I invested in a few extras from a UK outfit called Cool Components that sell the Arduino and plenty of shields and extras. To give me enough to start with, I picked up:
140-Piece Wire Kit
Electronic Brick Kit
Generic Starter Kit
Jumper Wires – Female to Female
Jumper Wires – Male to Female
Although in hindsight, I should have bought a few more male to male jumper cables as these seem to be the primary cable type!
Getting up and running was a breeze, remembering my basic electronics from my childhood stood me in good stead to build a small circuit, and google/youtube filled in the blanks easily!
So what did I build?
Essentially its 5 LEDs running in a sequence, with the timing controlled by an analogue rotary switch or potentiometer, as I learned it was called. It actually took longer to figure out it wasn’t called a “rotary encoder” which is apparently something very different and digital, than it did to code the entire program and build the circuit!
The circuit is simple:
…and so is the program:
/*
Jabawoki Light tracer V1.0
22/07/2011
*/
int potpin = 0;
int val;
void setup() {
pinMode(12, OUTPUT);
pinMode(11, OUTPUT);
pinMode(10, OUTPUT);
pinMode(9, OUTPUT);
pinMode(8, OUTPUT);
}
void loop() {
// Read the Analog Pot
val = analogRead(potpin);
// Switch the LEDs on
digitalWrite(12, HIGH);
digitalWrite(8, HIGH);
delay(val);
digitalWrite(11, HIGH);
digitalWrite(9, HIGH);
delay(val);
digitalWrite(10, HIGH);
delay(val);
// Switch LEDs off
digitalWrite(12, LOW);
digitalWrite(8, LOW);
delay(val);
digitalWrite(11, LOW);
digitalWrite(9, LOW);
delay(val);
digitalWrite(10, LOW);
delay(val);
}
What more could you ask for in a prototyping platform?
You can download the code and schematics for this project from the downloads section
Watch this space, I have 5 key projects I am planning once I get my head properly around this, some of which will blow your mind.
Here is some video of the project working in all its glory!
http://www.youtube.com/watch?v=K9rIHjsyiUs
Related Images: [...]
Alfa 159Part of any major power upgrade includes a Front Mount Intercooler conversion to enable the maximum airflow through the compression system, while maximising the cooling opportunity.
The stock intercooler on the 159 is quite restrictive and behind several radiators limiting good airflow to it and also has very restrictive ports for the airflow in and out of it. All due to size and placement options at the factory.
The stock pipework has an ID of 60-63mm so isn’t exactly huge, but is good enough for 3.5-4bar. Its the intercooler that could use a bit of an upgrade!
Once the stock intercooler is removed, all of the other radiators can shuffle around so that it goes (from the engine to the front of the car) Water Rad > Air Con Rad > Oil Rad > Power Steering Rad. All of these items clip to each other so removing the stock intercooler just allows you to put them all back in a different order without any further mods. You will likely need to have the aircon re-gassed and refill the cooling system as doing this without disconnecting those systems is extremely difficult!
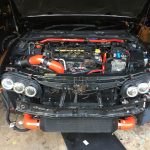
An optional upgrade is to remove the stock oil cooler and move that to a larger MOCAL unit located where the stock intake is, but this requires removal of the stock intake and all associated pipework and replacing with something like a BMC-CDA or Cone filter under the bonnet like I have done.
In terms of the parts needed for this conversion, it isn’t that many. Firstly, you need the right sort of intercooler, cheap and efficient! Fortunately, the JDM scene has us covered! They have a standard sized unit that has a 600x300x76mm core that is used in big power Supra and GTR upgrades. Its readily available on ebay for less than £100 delivered.
Make sure you buy the “bar and Plate” type rather than the “tube and fin” ones. The bar and plate type have additional internal structure designed to create turbulence in the airflow and maximise the cooling efficiency.
One thing I will say about these intercoolers; is they do not age well. While they turn up very shiny and polished, after about 2-3 months on the front of the car they go a horrible grey pitted colour that is quite unsightly! I therefore do recommend getting it painted black to help create the stealth look. Of course adding a layer of paint will reduce the efficiency slightly so make the layer as thin as possible.
There are arguments for and against painting the intercooler here:
For:
Against:
While the science is compelling, from experience of running the same setup painted and unpainted, there is nothing in it! I see extremely efficient cooling even with it painted black!
This unit, once bought, needs to be mounted. Fortunately, due to the shape of the 159/Brera there is a huge space up front where this can live with ease! I have designed some brackets that attach directly to the lower sub-frame and provide a mount for this, or any other intercooler. You can get these brackets made up at any local machine shop for £20-30.
The design can be downloaded free of charge:
Once its mounted on the lower sub frame its very solid, but you will need to make some custom tie bars for the top that secure it to the front crash bar. I used some 1mm steel I had lying around and just cut and bent it to shape:
The Intercooler has M8 sockets welded onto it so you will need 4 x M8 bolts @ 12-14mm long to mount it to the brackets and the brackets will need 4 x M8 @ 50-55mm long to go through the lower sub frame.
The pipework is custom, so while I can tell you what bits you need, its up to you to measure and cut them! I strongly recommend watching this video on how to cut silicon pipes before starting:
You are going to need the following bits:
Hot Side (pre cooler)
63mm Joiner (102mm long)
63 – 76 @90 degree reducer elbow
Cold Side (post cooler)
60mm Joiner (102mm long)
60 – 63 @45 degree reducer elbow
63 mm joiner (102mm long)
63 – 76 @90 degree reducer elbow
Mishimoto Constant Tension T-Bolt Clamps
6 x 2.75″ (for the 3 x joins)
2 x 3″ (for the FMIC)
Mikalor W2 Stainless Steel Clamps
1 x 49-63mm (Cold side metal intake pipe)
1 x 55-59mm (Hot side turbo connection)
I can recommend ASH in the UK for the pipes and the joiners, I used them and they are great quality. They are on ebay here: http://stores.ebay.co.uk/autosiliconehosesoutlet/
Do not underestimate the clamps or the joiners! I have tried several different types of both and have had reliability issues resulting in boost hoses popping off at the most inconvenient times! Spend the money, get the best possible parts.The Mishimoto clamps are the best I have seen and provide an extremely good clamp with a system that allows for heat expansion and contraction without sacrificing grip.They dont make constant tension clamps small enough for the connections on the turbo or metal intake so I suggest using Mikalor clamps instead. A very strong clamp just without the heat expansion capability.
You can buy the clamps direct from Mishimoto or the usual ebay sources.
The ASH joiners have very significant insertion into the pipes so you can get lots of grip with the clamps and minimise potential movement that can work a join loose over time!
I have used other joins in the past and they have failed repeatedly, to put that in perspective, take a look at the difference between a popular silicon joiner and the ASH one:
The hot side of the FMIC only needs a single 90 reducer and can be joined directly to the OE pipe with a 63mm joiner.
On the hot side you need to trim back the 90 reducer on the 63 side, and join that to the 63 side of the 45 reducer. This will also need to be cut back and the stock pipe will need to be cut back also. These are the only three cuts you need to make but measure twice and cut once! The 60 side joins to the stock pipe where you cut it as its slightly narrower in the middle than at the ends. I’ll caveat that the pipes I used here had already been previously cut. Its possible that the stock cold side pipe may join directly with the 90 and not need the 45 if not cut. Its something you are going to have to test fit yourself!
Make sure to place your clamps in such a way as they are easy to get to once the bumper is back on as they may need tightening in the future and this will make life much easier!
Make sure you do not have any pipes catching on anything sharp. If they do they can eventually fail through the vibrations from the engine. I had a previous OE hot side pipe fail as it was rubbing on the frame and it was £100 to be replaced!
Once you have the pipes all done, it should look a little like this.
Related Images: [...]