

Welcome to my digital home! There are lots of articles you might find helpful buried in this site on topics such as modifying an Alfa Romeo 159, rebuilding a Lotus 7 (Robin Hood 2B), not to mention a ton of stuff on technology in general. It’s all here somewhere, so use the search function or navigate using the menu structure. if you want to talk, reach out via the contact function, I usually do answer!
Random Post Selection

InfoSecI am getting a little annoyed with hearing people wax lyrical about “the cloud” and how its going to revolutionise the world. I have a news flash for you all, its not new and its not revolutionary!
First of all, lets define what we are talking about. There is a simple definition for Cloud Computing, and three models of operation as held by NIST, these are:
Definition:
Cloud computing is a model for enabling convenient, on-demand network access to a shared pool of configurable computing resources (e.g., networks, servers, storage, applications, and services) that can be rapidly provisioned and released with minimal management effort or service provider interaction. This cloud model promotes availability and is composed of five essential characteristics, three service models, and four deployment models.
Models of Operation:
Cloud Software as a Service (SaaS). The capability provided to the consumer is to use the provider’s applications running on a cloud infrastructure. The applications are accessible from various client devices through a thin client interface such as a web browser (e.g., web-based email). The consumer does not manage or control the underlying cloud infrastructure including network, servers, operating systems, storage, or even individual application capabilities, with the possible exception of limited user-specific application configuration settings.
Cloud Platform as a Service (PaaS). The capability provided to the consumer is to deploy onto the cloud infrastructure consumer-created or acquired applications created using programming languages and tools supported by the provider. The consumer does not manage or control the underlying cloud infrastructure including network, servers, operating systems, or storage, but has control over the deployed applications and possibly application hosting environment configurations.
Cloud Infrastructure as a Service (IaaS). The capability provided to the consumer is to provision processing, storage, networks, and other fundamental computing resources where the consumer is able to deploy and run arbitrary software, which can include operating systems and applications. The consumer does not manage or control the underlying cloud infrastructure but has control over operating systems, storage, deployed applications, and possibly limited control of select networking components (e.g., host firewalls).
Now, I am pretty sure that during my long career, I have seen a lot of companies doing IaaS and PaaS as a “Business as Usual” activity, haven’t you? In my experience, IaaS is nothing more than a traditional infrastructure outsourcing arrangement, as undertaken with IBM, HP/EDS or BT, while PaaS is just a simple hosting service offered by most ISP’s (I accept I am simplifying here). So what are we really talking about when the press pickup and pedal the term “cloud computing”. Looks to me like they are talking about SaaS, which again, has been around for a while, Hotmail anyone?, but not really taken off in the enterprise until it became “cloud computing”. So is this just a media spin to pedal Hotmail to the enterprise or just a natural progression from outsourcing boxes to apps? What is revolutionary here, I am yet to see.Related Images: [...]

LiveMixesJust messing around with some choonage, only 30 minutes or so long but some interesting choons and it doesn’t sound too bad
https://jabawoki.com/wp-content/mp3/122009JabawokiMessinAround.mp3
Podcast: Play in new window | Download
Related Images: [...]
RH2B Build DiaryI had wanted a flat bottomed race wheel from the day I bought the car but other more pressing issues were ahead of the modification! The original wheel was a 280mm (small) 10″ old style wheel that was just difficult to use. It was also so far forward that your legs were right on it so it needed to be modified!
That said, I bought myself a very reasonably priced 320mm flat bottomed suede OMP Racing wheel, a universal quick release boss, and a Momo steering wheel hub to fit the Sierra base. Once I had the parts, it was far more of a mamouth task than I originally thought!
OMP Wheel on quick release boss.
The first problem I had was getting the old hub off. I had to make a bar with a bolt in the center and bolt that to the hub then use the center bolt to push the wheel off the spline. Getting to that point took me the best part of 4 hours!
Once it was off, the new Momo boss went on like butter, and then the back half of the universal boss mated straight to it. Up came the next problem though as the centre horm push was slightly too big to go into the universal boss so I had to modify it and sold the wires on the back of the horn push in order to get it all fitted.
Ready to race!
Once the wheel was installed I had to readjust the toe on the front end to line up the wheel and the wheels, but its going in for an MOT and a full alignment once its back on the road so I am not too worried!
Related Images: [...]

ElectronicsWell I finally got round to purchasing an Arduino Uno Open Source Prototyping Platform and first impressions are !WOW. I am genuinely impressed with the overall package, its flexibility and quality of the hardware and software. First off, getting up and running on your favourite OS is a breeze, with detailed step by step instructions available on the Arduino site.
Aside from the basic Uno itself:
I invested in a few extras from a UK outfit called Cool Components that sell the Arduino and plenty of shields and extras. To give me enough to start with, I picked up:
140-Piece Wire Kit
Electronic Brick Kit
Generic Starter Kit
Jumper Wires – Female to Female
Jumper Wires – Male to Female
Although in hindsight, I should have bought a few more male to male jumper cables as these seem to be the primary cable type!
Getting up and running was a breeze, remembering my basic electronics from my childhood stood me in good stead to build a small circuit, and google/youtube filled in the blanks easily!
So what did I build?
Essentially its 5 LEDs running in a sequence, with the timing controlled by an analogue rotary switch or potentiometer, as I learned it was called. It actually took longer to figure out it wasn’t called a “rotary encoder” which is apparently something very different and digital, than it did to code the entire program and build the circuit!
The circuit is simple:
…and so is the program:
/*
Jabawoki Light tracer V1.0
22/07/2011
*/
int potpin = 0;
int val;
void setup() {
pinMode(12, OUTPUT);
pinMode(11, OUTPUT);
pinMode(10, OUTPUT);
pinMode(9, OUTPUT);
pinMode(8, OUTPUT);
}
void loop() {
// Read the Analog Pot
val = analogRead(potpin);
// Switch the LEDs on
digitalWrite(12, HIGH);
digitalWrite(8, HIGH);
delay(val);
digitalWrite(11, HIGH);
digitalWrite(9, HIGH);
delay(val);
digitalWrite(10, HIGH);
delay(val);
// Switch LEDs off
digitalWrite(12, LOW);
digitalWrite(8, LOW);
delay(val);
digitalWrite(11, LOW);
digitalWrite(9, LOW);
delay(val);
digitalWrite(10, LOW);
delay(val);
}
What more could you ask for in a prototyping platform?
You can download the code and schematics for this project from the downloads section
Watch this space, I have 5 key projects I am planning once I get my head properly around this, some of which will blow your mind.
Here is some video of the project working in all its glory!
http://www.youtube.com/watch?v=K9rIHjsyiUs
Related Images: [...]

Alfa 159Daily Power is a work in progress but boost is at 3500mbar and fuel is flowing at 130mm3 so it should be good for a solid 800NM+ as a daily driver 🙂 #noSmokenoPoke
Power:
Base Model: 2008 159 TI 2.4 JTDM QTRONIC (Diesel)
Base Power: 200bhp / 400nm @ the flywheel
Dyno Power: 317WHP / 793NM @ front wheels (with Water/Meth 500cc) @ 3200mbar
Daily Power: TBC WHP / TBC NM @ front wheels (with Water/Meth 1000cc) @ 3500mbar
The run above had a faulty water/meth controller which is why its a little jumpy!
Old Dyno Runs of when it was around 250bhp:
Dyno run 1
Dyno run 2
Dyno run 3
Dyno run 3 alternative angle
Dyno run 4
Dyno run 4 alternative angle
Engine Mods:
Blow back Recirculation Breather System re-routed to exhaust via E-Vac Scavenger and one way morroso valve
Swirl Valves fully blanked in the Manifold
Straight through Wizard exhaust with no CAT’s, no DPF and no mufflers on 4″ tails
600 x 300 x 76mm core High Flow, Front Mounted Inter-cooler with custom pipework and mounts
18 row Mocal oil cooler (235mm)
Hybrid GTB2056 Turbo (BMW 530D Gt22 Turbine Conversion, 62mm Extended tip billet Compressor Wheel with 4mm extended tips and 49.60mm inducer “62 trim”, Blueprinted, staggered gap oil seals on exhaust side, 15 degree cutback / clipped turbine wheel and 63mm custom intake adapter)
4bar TMAP sensor
80mm BMC CDA direct to turbo on custom 2ft pipe run for maximum de-restriction
Water Methanol System (AEM Pump & 1000cc/min nozzle + Devils Own 100psi/7bar Progressive Controller)
Inline OIL sensor reservoirs on Engine and Gearbox
Inline Mocal thermostatic control valve on gearbox oil cooler
All ECU Mapping work courtesy of Jacekowski and Jabawoki.
Handling Mods:
255/40/19 Vredestein ULTRAC Vorti Tyres
Spacers on wheels to stance / prevent rub!
Autolusso Braided Brake Lines
Performance Friction Brake Pads @ Front
EBC Yellow Brake Pads @ Rear
MTEC Groved, Vented & Dimpled Discs with Black Treatment all round
ATE TYP200 Racing Brake Fluid
Bilstein B12 Pro Suspension Kit (B6 Shocks & Eibach Springs)
Powerflex Front Upper and Lower Bushes
Modified upper arms with greese nipples
New 330mm Brembo calipers
Lighting Mods:
H7 LED’s for Driving & Main Beam including custom dust caps
Full External LED Conversion
Full Internal LED Conversion
Cylon High Level LED brake light
Project Halo – Tri-Halo DRL Conversion
Electrical Mods:
16v 83.333F Super Capacitor Bank on primary electrical system
230v AC Socket in Glovebox
Twin Digital Temp Gauge (Engine and Gearbox Oil) in air vent mount
secondary fused distribution boxes under dash and in engine bay for ancillaries
All wiring and ancillary systems wrapped to look stock.
Gearbox Radiator Cooling System
100Amp Shunt and Volt / Ammeter from Capacitor Bank to Battery
Multiple 2.2amp USB sockets and feeds for general convenience!
Under Bonnet Temperature Sensor / Gauge
Audio Mods:
Custom Sub Enclosure with 12″ Infinity KAPPA Perfect 12VQ M3D Sub
Fully Soundproofed
Modified Alpine MRV-T420 Amplifier
Custom Wiring
Pioneer AVH-X5700DAB
FM/AM/DAB+/GPS Aerial Mod
Visual Mods:
Fog Lights removed from front bumper and re-grilled for greater air flow to additional radiators
Latest Gen Badges all round
Some stickers:
Cloverleafs …because race car.
Nurembergring Sticker …because she’s been 🙂
“Built Not Bought” …because she is.
” order_by=”sortorder” order_direction=”ASC” returns=”included” maximum_entity_count=”500″]
Related Images: [...]
InfoSec……can be reverse engineered by mankind.
Its a simple mantra, but one that has served me well in security.
Think of of this way, it doesn’t matter how intelligent you are, someone, somewhere is more intelligent! When it comes to security this is never more true. As we all know, security is asymmetric, in so much that the effort required to secure something is significantly more than that required to break into it. Given this point, it makes the mantra even more relevant! If security was symetrical, you would have a 1:1 effort relationship, however, as its not, (we will for the purposes of this article assume its 2:1, i.e. double the effort required to secure), it would theoretically take less brain power than it took to create the control to break it.
Obviously I accept that this is a very simplistic representation of the point, but one I think is valid.
Related Images: [...]
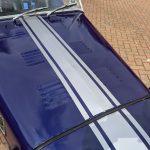
RH2B Build DiaryThe bonnet on the hoody is metal, in two sections, and was bolted together on a centre flange. This left a seam that was filled with filler and then a vinyl stripe laid over the top.
Now this would have been fine except for the fact that the builder then installed a long pneumatic ram (the type that opens a boot on a hatchback) to hold up the bonnet when you lift it. Great for convenience but done in such a way as to cause a long term issue.
Essentially, as the weight of the bonnet and nose cone were pivoting on an M8 bolt attached to the centre flange (2 x 1mm steel), the flange had twisted, bent and caused the bonnet to deform above. This in turn caused the filler to crack and separate from the bonnet, which then caused the vinyl to crack leaving an unsightly jagged line down the centre of the bonnet.
Bonnet damage after removing the vinyl and cracked filler.
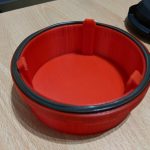
Rather than just filling it and applying another vinyl sticker to it, knowing it would just do the same again, I set about designing and printing a better solution to the mounting of the jack point to the bonnet and also reinforcing the flange with several additional M8 bolts!
A few iterations in Fusion 360 and 3 test prints in PLA, I had a final design that met the profile of the bonnet, bolted through the flange, spread the load of the bonnet more evenly and provided a solid anchor point for the jack.
Design iterations
The final design is pretty cool. It spreads the load exactly as I wanted and prevents the centre of the bonnet where the filler is being pushed up. It has also added rigidity to the panel as a side effect.
Finished mount
Once the mount was installed all that was left to do was fill the resulting gap with a flexible filler that wont crack and fall out, sand it smooth(sh) and the re-apply the vinyl. What I learned from this experience is something I was already pretty cognizant of. I cannot do bodywork!!! I dont have the patience for it at all!
Finished article. Its by no means perfect but will do for now!
Related Images: [...]
InfoSecIt seems that since vendors started bringing out bug bounties, for all the right reasons I might add, a new breed of “security researcher” has appeared. This new type of researcher is single minded in his/her task and has a simple, no effort, no thought way of achieiving it “fuzzing!”
Dont get me wrong, fuzzing is a legitiamte and good technique, but dont hide behind a wall of fuzz and consider yourself a security researcher, have an original idea, something that would benefit the community/country/world order, and put your efforts into that instead of lining your pockets with vendor dollars!
Right now, we have an entireley new breed of researcher, focussed on notoriety, fame & profit, and that is not the right thing for the industry. What we need are innovators, original thinkers, thought leaders (real ones not self proclaimed hacks that peddle vapourware to the masses, I work with lots of these fools).
You will notice a distinct lack of personal research from myself, and probably decide as a result I have no business writing this post, however, That is largley due to the fact all of my “original thought” is applied directly to my business and through that to my clients and therefore the actual, realised benefit of improving the world in some small way, so rather than hunting for kudos in the ether or “peer respect” from people I have never met, I prefer to come up with an idea that benefits people, opperationalise that idea, apply it to my clients, and make a profit along the way.
//RANT OVER//
Related Images: [...]
InfoSecOpen post to see coverage:
Insurance Times – March 2009 – Data Loss Issues
Related Images: [...]
3D / Alfa 159So, many of you who read my previous post on the TEVO Black Widow 3D printer might have thought, oh hes bought another toy. Well, while that is mostly true I had an actual reason for getting one.
— Download the free model and print your own —
I have long been a modifier of my toys, and the Alfa 159 I drive takes the brunt of my desire to modify and improve. To that end there is often a gap between my imagination and my ability to manufacture, that has long eluded me. Until 3D printing became a thing.
So here’s the issue. The Alfa 159 halogen headlights suck. Even with the brightest bulbs available in they still suck, So the best option is/was to fit aftermarket HID’s. Until this year that was all well and good and the car would pass its annual MOT with aftermarket HID’s fitted, however this year it looks like the rules are changing and if it has after-market HID’s fitted it will fail 🙁
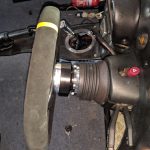
So, the options were, fit Halogens back in or go with the latest style high power LED bulbs. The main issue with the latest LED Bulbs is they get super-hot and need a big cooling assembly on them which make them too long for the headlight. So to use them you have to leave the dust caps off the back of the headlight which is less than ideal as it allows the moisture and dirt to get in and cloud up the lights.
I have been trialing a few different LED’s and all of them are far too long. If you look at the image below you can see just how far this particular LED protrudes, and this is one of the shorter ones!
This LED can be purchased from ebay for £19.99 and I have been using them in my main bean for a while now. I am quite happy with them as main beam lights but only trialing them on driving lights at the minute. They do require a small amount of the plastic surround shaving off to fit in the driving light position though. just 1mm from each side as they are a bit fat, but its a 2 second job with a knife and doesn’t harm them.
Once they are installed though, as you can see there is no way the stock dust cover goes back on! So the solution is simple. I need a deeper dust cover that can accommodate a longer bulb. Problem is, they don’t exist, and to have one made would be prohibitively expensive. Until you add a mad Englishman who subscribes to the old ways of “man in shed will make stuff” but likes to embrace modern manufacturing techniques, on a budget.
The result, well that would be “my first thing” available for any 159’er who wants one to download and print for free (yes they fit a Brera and a Spider too) 🙂 You’re welcome.
All in all this took me a weekend to do, and includes the time it took me to source a decent CAD tool, learn it and figure out how to transpose the original shapes into CAD. It took 19 drafts, 4 prototype prints and at least 5 complete “start again from scratch” moments!!
All in all I’m pretty happy with it, and the main thing is it actually works. I will reprint these at some stage in ABS plastic as my printer is only setup for PLA at the minute which by its nature is biodegradable and will not last too long in the engine bay. I may yet refine the shape as I go to take off some of the sharper edges but it’s a perfectly functional solution to a problem that was going to remain otherwise unsolved.
I have many plans for future parts that I will be designing so this is just the start 🙂
Related Images: [...]